Kali Nethunter Magisk Module Zip 2023.Available versions of Kali NetHunter include NetHunter Rootless for unrooted devices, NetHunter Lite for rooted devices with custom recovery, and a NetHunter-specific kernel for rooted devices with custom recovery (NetHunter).
Table of Contents
Kali Nethunter Magisk Module Zip 2023
Installation instructions

- Install attached Magisk Module
- Reboot device
- Run Nethunter app – allow 7(!) Root-related permissions prompts and wait for initialisation
- Download Chroot from here the Full Chroot or the Minimal Chroot;
- Put it in the path “/sdcard/” and rename it to kalifs-full/minimal.tar.xz
- Click “Kali Chroot Manager”
- Click “Install Kali Chroot” – “Install from sdcard”
- Select the prefered Chroot Kali package
- Wait for Chroot install (this may take a few minutes)
- Click “Install & Update” – allow Root permission for Nethunter Terminal app
- Enjoy!
Not Working
Anything that needs a customised kernel or ramdisk won’t function right out of the box. This comprises:
- (Requires modified kernel/ramdisk) Wi-Fi injection
- HID Interfaces (such as BadUSB, Duckhunter, etc.; additionally requires a modified kernel and ramdisk)
How To Uninstall Kali Nethunter On Android
- Click “Remove Chroot” after loading “Kali Chroot Manager” in the Nethunter application (Reboot and Remove Chroot)
- Kali Nethunter Magisk module should be removed (Reboot)
- Remove Kali Terminal, Kali VNC, and Nethunter manually
- Delete any lingering files – nh files and nh install *.log on the SD card
NetHunter Editions

One of the following editions of NetHunter can be installed on virtually every Android device under the sun:
| Edition | Usage |
|---|---|
| NetHunter Rootless | The core of NetHunter for unrooted, unmodified devices |
| NetHunter Lite | The full NetHunter package for rooted phones without a custom kernel. |
| NetHunter | The full NetHunter package with custom kernel for supported devices |
| Feature | NetHunter Rootless | NetHunter Lite | NetHunter |
|---|---|---|---|
| App Store | Yes | Yes | Yes |
| Kali cli | Yes | Yes | Yes |
| All Kali packages | Yes | Yes | Yes |
| KeX | Yes | Yes | Yes |
| Metasploit w/o DB | Yes | Yes | Yes |
| Metasploit with DB | No | Yes | Yes |
| NetHunter App | No | Yes | Yes |
| Requires TWRP | No | Yes | Yes |
| Requires Root | No | Yes | Yes |
| WiFi Injection | No | No | Yes |
| HID attacks | No | No | Yes |
Installing NetHunter On Android
The next step is to set up your Android device before installing the image that you either downloaded or created yourself. “Setting up your Android device” contains:
- upgrading your device to stock AOSP or LineageOS after unlocking it (CM). For a list of supported roms, see point 2.0.
- putting in Team Win Recovery Project as a customised recovery.
- If TWRP is unable to access the data partition, using Magisk to root the device and removing force encryption may be necessary.
- All that is left to do is flash the NetHunter installer zip file onto your Android smartphone once you have a custom recovery set up.
Kali NetHunter Attacks Feature

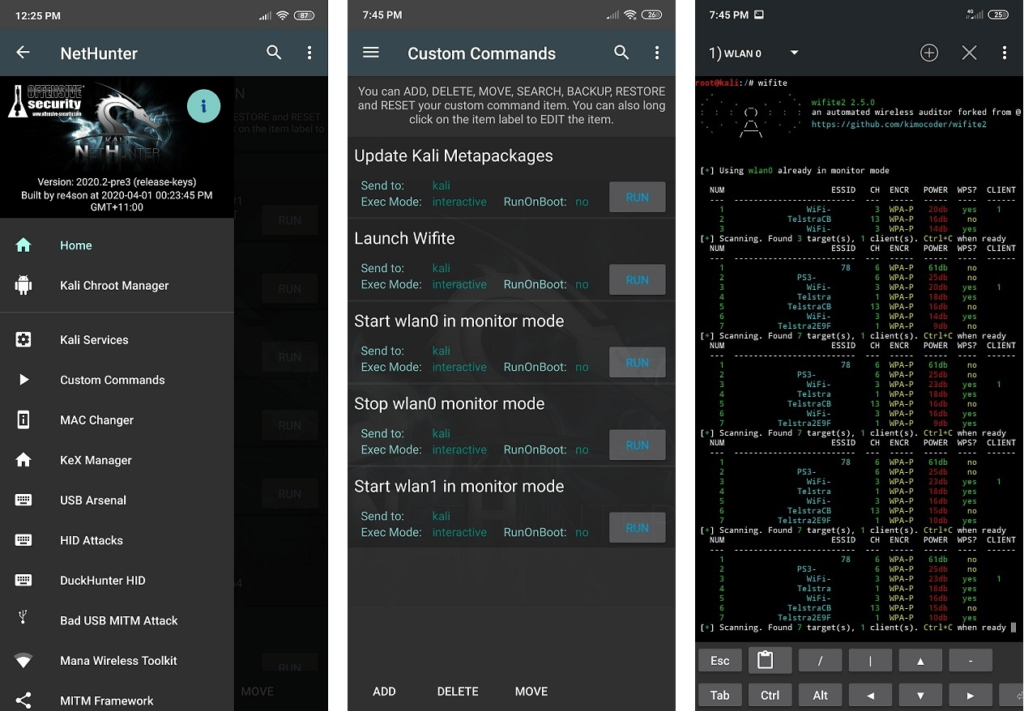
- Home Screen (Network interfaces, a general information panel, and the status of HID devices)
- Kali Chroot Manager (chroot metapackage installations management)
- Kali Services (various chrooted services can be started or stopped. At boot time, turn them on or off)
- Custom Commands (You can customise the launcher by adding your own commands and features)
- MAC Changer (Wi-Fi MAC address modification only on certain devices)
- KeX Manager (Create a VNC session right away using your Kali chroot)
- USB Arsenal (control the settings for USB devices)
- HID Attacks (Several HID attacks in the Teensy fashion)
Learn More: How To Fix Safety Observation Period Ban In PUBG 2.3
- BadUSB MITM Attack (Enough said)
- MANA Wireless Toolkit (With a single click, create an evil access point.)
- Bluetooth Arsenal (Listen to, spoof, recon, or insert audio into different Bluetooth devices)
- Social Engineer Toolkit (For the Social Engineer Toolkit, create your own phishing email template.)
- MITM Framework (dynamically add binary backdoors to downloaded executables)
- NMap Scan (Nmap scanner interface in a hurry)
- Metasploit Payload Generator (making ad-hoc Metasploit payloads)
- Searchsploit (Simple exploit search in the vulnerability database)
How To Install Nethunter On Any Android
Flash rooted stock Android
A non-rooted Android image that comes with the Gemini PDA has to be changed. Install the “Pentester Pro” image with partitions for rooted Android and Kali Linux as described here: Kali Linux PDA Gemini
or, if you want a different division layout, make your own image: support.planetcom.co.uk/index.php/Linux Flashing Guide At the time of writing (26/02/2019), the official partition tool does not provide a rooted Android image. The rooted version of the picture is identical to the non-rooted version.
Restart Android on the newly imaged Gemini, then:
- Set up the keyboard.
- join the wifi
- Launch the “Play Store” application and log in using your Google account.
- Update each app
To complete the rooting operation, launch Magisk Manager

- Run “Magisk Manager” and adhere to the instructions to update the programme.
It’s occasionally necessary to find a workaround because the magisk version that came with an Android image may not be compatible with the most recent magisk manager. If you receive a warning saying that the version of “Magisk Manager” you have installed is incompatible, you should downgrade the management app, upgrade Magisk using TWRP, and then upgrade the manager app once more as follows:
- remove the current version of Magisk Manager
- Magisk Manager 6.1.0 can be downloaded from Github Magisk.
- Turn “allow installation of apps from unknown sources” on in the “security” settings.
- Install Magisk Manager from the Downloads folder, open Magisk Manager, then disable “Check Updates” in “Settings” by selecting “no” to updates.
- magisk manager out
- Visit github.com/topjohnwu/Magisk/releases to get “Magisk” (not “Magisk Manager”) in its most recent iteration.
- When it’s convenient, continue installing TWRP and add the updated magisk version via TWRP. Open the “Magisk Manager” app after installation, then update the app by doing so. Note: Auto rotation appears to be broken in newer versions of Magisk. For now, let’s continue with the prior iteration.
How To Set Up TWRP recovery
- the “Official TWRP App” to be downloaded from Playstore.
- “Official TWRP App” should be opened.
- Choose your account
- Tick “I agree,” “Run with root permissions,” and then click “OK.” When prompted to grant root access, click “TWRP Flash.”
- If superuser permissions are not automatically granted, launch Magisk Manager and manually enable TWRP.
- Choose the “Planet Gemini PDA – geminipda” device.
- choose the newest version, download the picture, and then choose the image for Flash to recovery.
How To Set up NetHunter

Connect the Gemini PDA to your computer and download the NetHunter beta image from this page: http.re4son-kernel.com/downloads/gemini-nethunter
- the Gemini PDA with the NetHunter picture.
- Using the “Official TWRP App” (TWRP Flash->Menu->Reboot-Reboot Recovery), restart the Gemini PDA into recovery.
- click “Install.”
- swipe to confirm flash reboot after selecting the NetHunter image
- Start the “NetHunter” application, click “allow” seven times to grant root access, and then wait while setup is completed.
Nethunter Apt-get update not working
- Open Kali terminal
- Type “cp /etc/apt/sources.list /sdcard” without quotes
- Download and open es file explorer
- Navigate to internal storage
- Open sources.list in text form
- Remove all the content in the file and paste
deb http://http.kali.org/kali kali-rolling main contrib non-free
# For source package access, uncomment the following line
# deb-src http://http.kali.org/kali kali-rolling main contrib non-free
- Save it
- Open Kali terminal and type “cp /sdcard/sources.list /etc/apt” without quotes
Now your problem is fixed


