How To Use Custom Portraits In WWE 2K22. While the WWE 2K22 roster features many famous names, there are a few notable superstars who did not make the cut. That’s okay, though, because the game’s fantastic creation suite makes it incredibly easy for players to create or download missing wrestlers.
Custom Superstars don’t always blend in as well as some players would like. The game uses a render of their in-game model instead of an image of them on the Superstar selection screen. Fortunately, WWE 2K22 players can download and apply their own custom portraits in just a few steps.
Table of Contents
Custom Portraits in WWE 2K22
To download custom portraits in WWE 2K22, players must first turn on “Community Creations” in the “Online Options” menu. They’ll also need to sign in or create a 2K account.
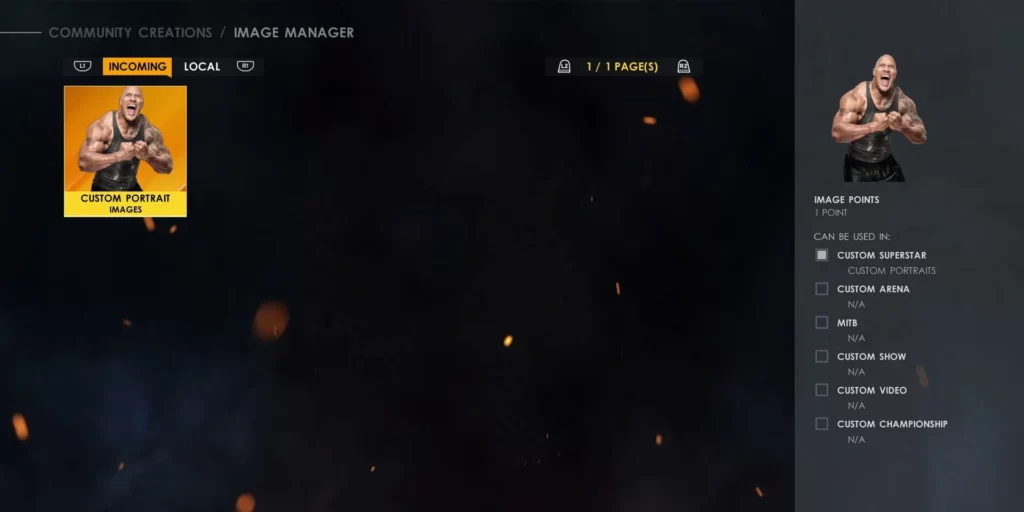
After that, open the “Community Creations” menu and select “Downloads,” then “Image.” Initially, they’ll only see the most recent uploads, but they can search for something specific by pressing the Triangle / Y button.
Players can use pre-defined hashtags for specific Superstars and events, or create their own by selecting “My Hashtags” at the bottom of the list. After finishing their search, players can pick their favourite custom portrait, select it, and click “Download” to save it.
How to Upload Custom Portraits in WWE 2K22
Occasionally, players may be unable to find or be dissatisfied with the available custom portraits. But don’t worry, uploading a new custom portrait is simple, if time consuming. On www.wwe2k.com, click on the big “Upload Images” button in the centre.
Also Read: Moth locations in destiny 2
After pressing the button, they must sign in to their PSN, Xbox Live, Microsoft, or Steam account. They’ll be taken to a special web form where they can upload a variety of image types. The custom portrait option is located at the bottom of the list on the left-hand side of the page.
Custom portraits require a 1024×1024 pixel png file with a transparent background. They can upload their image after accepting some terms and conditions and selecting a file that meets these requirements. They can then go to the “Image Manager” section of the “Community Creations” menu and download any images they’ve uploaded by pressing X/A.
WWE 2K22 Custom Portraits
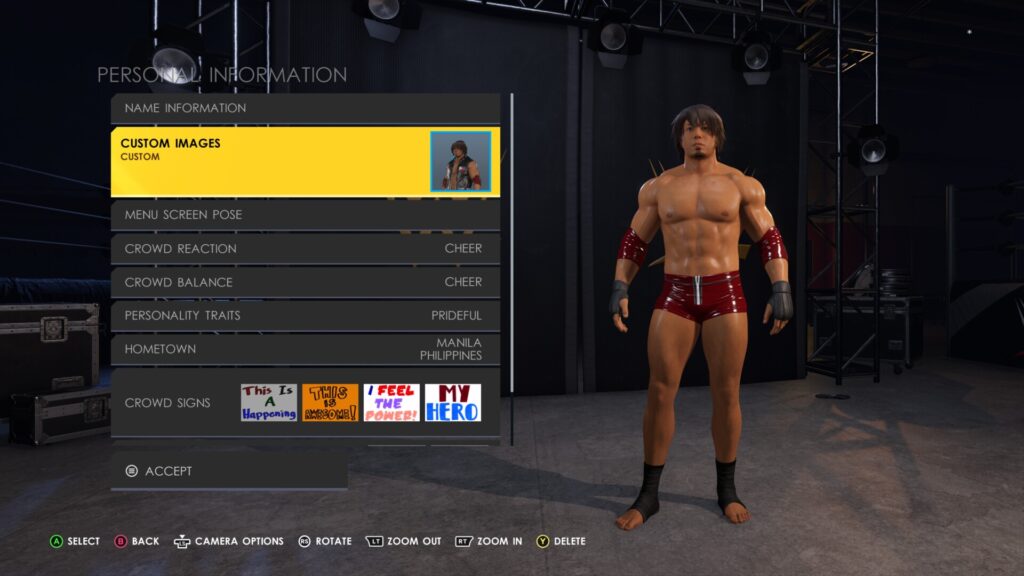
To apply a custom portrait to a custom Superstar, go to the “Creations” tab and open the “Superstar” menu. A custom portrait can then be applied to a custom Superstar by selecting “Edit Custom Superstar” from the menu.
From the “Create Your Superstar” menu, select “Personal Information,” then “Custom Images.” This lets them choose from custom portraits downloaded to their PC or console. The player’s newly assigned custom portrait is now visible when selecting their custom Superstar.
How to Use a Custom Portrait in WWE 2K22
Custom portraits can be applied to custom Superstars as well as alternate attires of regular Superstars in WWE 2K22. To do so, go to the Creations tab, “Superstar,” and select “WWE Superstar.” This will allow them to design a new outfit for any existing Superstar and save it as a custom Superstar.
Players can edit their new attire by selecting “Edit Custom Superstar” from the “Superstar” section of the Creations tab. To name or set a custom portrait for it, they must first turn off the “Use as alternate attire” option in the “Personal Information” section. Toggle this option back on after applying the custom image and setting the name.
Players should now be able to select their custom attire from the character selection screen, just like any other alternate attire found in the game. Both during the custom attire selection and the loading screen should show their custom portrait, though the latter may take a few seconds to load.